PART VI: JUNIOR YEAR

This is when it all really takes off.

The summer before my junior year, I got my first real taste at astronomy research at ERIRA: educational research in radio astronomy. It’s a week long that’s filled with a dozen projects you can pick to be a part of (even more than one, which most of us did).


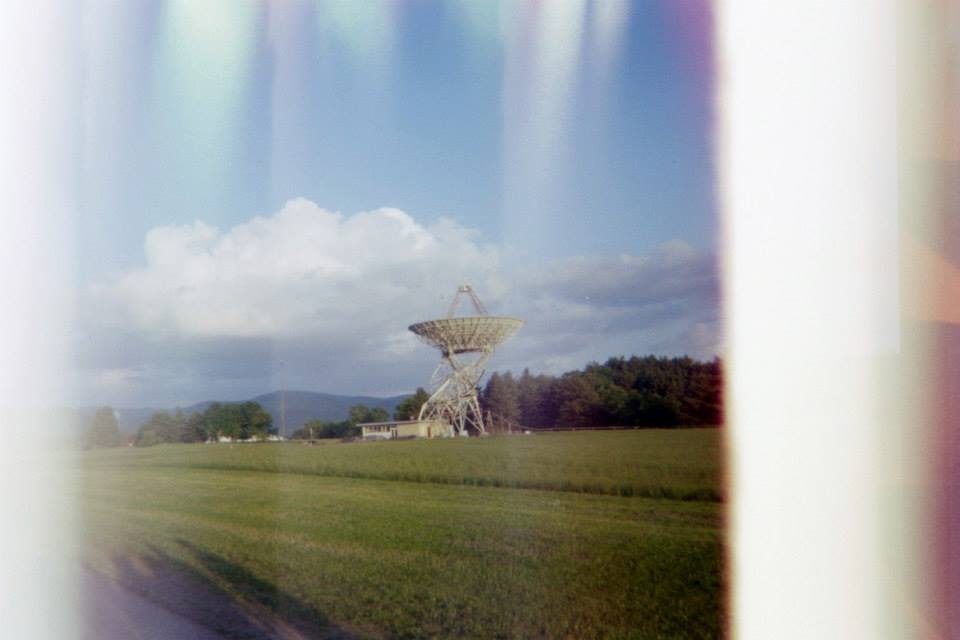
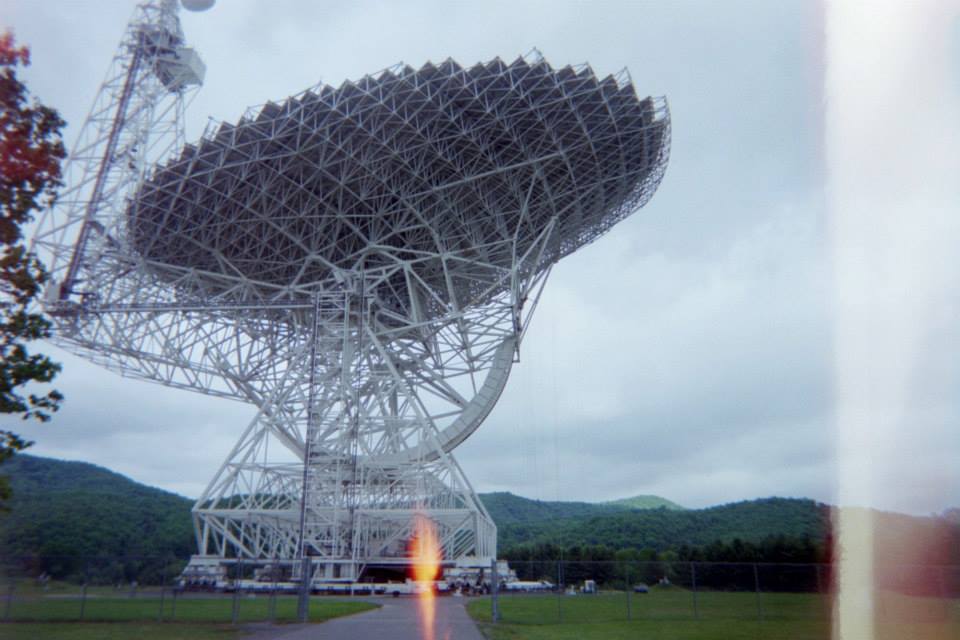
That was an amazing week! The National Radio Astronomy Observatory (NRAO) hosts ERIRA every year and the telescopes sit in a valley in the middle of the Appalachian mountains in Green Bank, West Virginia. The largest directional radio telescope sits here (and pictured below!) with a whopping diameter of 100 meters. The telescope is so sensitive, you are not allowed to have WiFi, cameras, cell phones, laptops, regular phones, or desktop computers nearby and especially not outside. I’m not kidding! So for the week I was there I was isolated from the rest of the world, in this gorgeous, dark valley. At night you can see all the stars, count a satellite moving by a minute, and see the Milky Way. It was breath taking. Being unplugged for that entire week was rejuvenating. If you wanted access to your laptops and cell phones, you had to use them inside and could only use an ethernet. Computer labs are literally encased in a Faraday cage and you have to be sure to completely close the cage up when entering or leaving. The control room for the telescope is even in a Faraday cage.

What’s more is the city has something like a 15 mile radius of Radio Quiet Zone. Anyone living in Green Bank is not allowed to have WiFi or other popular technology that could interfere with the telescopes. In fact, there’s a neighbor there that was so disgruntled by the law that he not only got WiFi, but named his network something like “Ki$$MyA$$NRAO”. The city is becoming well known for its radio quietness because people who believe they are getting sick from electromagnetic radiation are moving there. This is not a legitimate disease! But anyway….

So, I didn’t hate radio astronomy. In fact I loved everything about it minus waking up at 2:00am to survey 3 hours worth of the night sky. That part I did not like so much. I decided to join like four groups and I studied the following:


  • Searched for pulsars
  • Studied parallax using Saturn’s moons
  • Measured the mass of the Milky Way Galaxy
  • Measured the heat flux from Jupiter

My favorite was measuring the mass of the Milky Way. I saw firsthand how people discovered dark matter! We took data for hours at night for the whole week and used a few simple physical equations to find the velocities of all of these objects. We then calculated the entire mass of the Milky Way using this. I remember I kept calculating the percent error over and over! I kept thinking, why am I getting 99% error on the Galactic mass?!!?!?!?!?! 

I went up to our instructor of this project and asked him this. He said, dark matter. And I was like OOOOOOOOOOOOOOOOH!!!! I didn’t really know much about dark matter (and I still don’t) but that result was really intriguing.

I carried what I learned with me back to Radford and my mentor, Dr. Rhett Herman, suggested I continue my radio astronomy interests through an independent study. I said, I mean yeah why not?

The start of my junior year, I was full swing in taking hardcore physics classes like modern physics, electromagnetism, electronics, and now an independent study. We purchased a pretty inexpensive Radio Jove Kit, mainly funded by NASA. It came with everything I needed to build my own telescope and radio receiver and all I had to do was actually build it. This was a really fun time because I not only got access to the roof of the science hall on campus but I also got a key! It was awesome. I got to go up to the roof whenever I wanted to work on the antennae. Naturally I was up there all of the time.

I had to build the antennae, build the radio, and get a computer set up to be compatible with the radio and software. Then I needed a nice quiet space so I could listen to static. Yep, that’s the stuff.

Picture


We just became best friends if you know what movie this is 😉
I built it all. But something didn’t work. I think something went haywire in the radio receiver – maybe a burnt out amplifier. I’m still not sure. Unfortunately, it took a little while to realize I wasn’t listening to anything. I did my radio astronomy independent study for both fall and spring semesters of my junior year but sadly gave up, anticipating the preparation for the 2016 trip back to Barrow, Alaska. Which by this time, I was very involved with. I wouldn’t shut up about the Arctic ice.


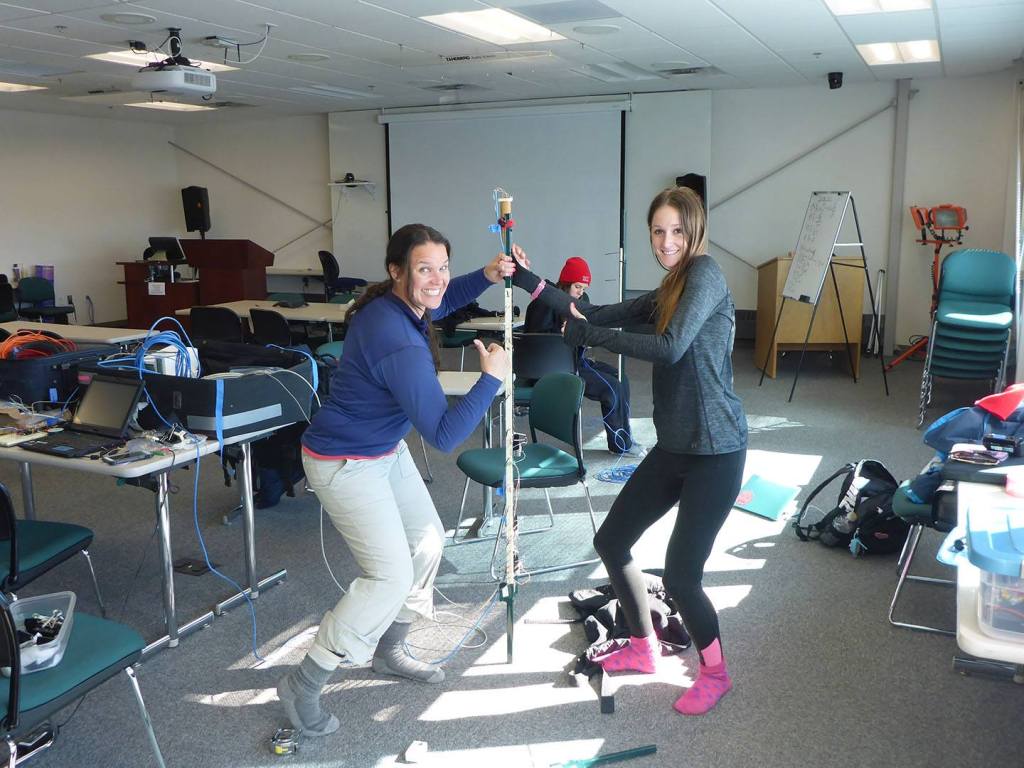
In the spring of my junior year, Rhett asked me if I wanted to help him build some electronics to be deployed in Barrow, Alaska in June 2015. The purpose was to measure a few quantities about the microclimate (about 10 meters above the tundra surface) in order to see why Arctic bird populations chose certain nesting sites and whether or not these decisions led to their survival. That was an incredible experience! I’ll get to the actual deployment of the equipment later and for now, I’ll focus on the preparation – which there was a lot of.

This was a really fun project to work on and I show a few photos of me working on the prototypes over the spring semester above! Because we had such little funding for the project, we had to be super resourceful on how we built equipment. We knew we wanted to measure the microclimate of the tundra environment which we defined to be about 10 meters above the surface. We used garden sticks as long standing platforms to places sensors on. We wanted to keep track of temperature (and any gradient that may exist as you move away from the ground), humidity, wind speed, and pressure. There are some pretty cheap electronics that can make that happen. I extensively made use of Arduino hardware which utilizes a custom software to run the codes but is set up in C++ language.


We eventually realized a huge problem. The temperature sensors were so sensitive that when exposed to direct sunlight, they read out temperatures nearly 10 degrees higher than the true temperature of the air. The direct sunlight was likely to effect the other sensors too and we weren’t sure how to go about this for a few months. Then it eventually dawned on me how perfect field hockey practice cones are for this exact problem. So I threw these babies on top of every temperature sensor, mounted them down, and tried it out. It completely solved the problem. Thank goodness for my field hockey days or we might’ve been stuck on that part a lot longer!

During this same time in the spring semester, I was taking full time classes (and getting a small extra stipend as a research assistant for the equipment development). I’m pretty sure I was taking electromagnetic theory I and optics. I was T E R R I B L E in these classes. I’m fairly certain I got a D in theory and only managed to weasel out of taking the course again because it was technically an elective for me since I was an Earth & Space concentration physics major. Just as a reminder that while yes, things were really going well for me at this point in time in getting a lot of research experience, it’s not like I was this amazing overachiever always shocking people with my great performance. 

I got a B in optics but I knew I didn’t deserve it. The teacher was too nice to give me the C or D I truly deserved. Looking back, I could probably crush that course now because it’s all just algebra for the most part but for some reason I wasn’t as invested in this course and never took the time to sit down and really understand the material. I guess I was too busy building nesting location measurement devices!

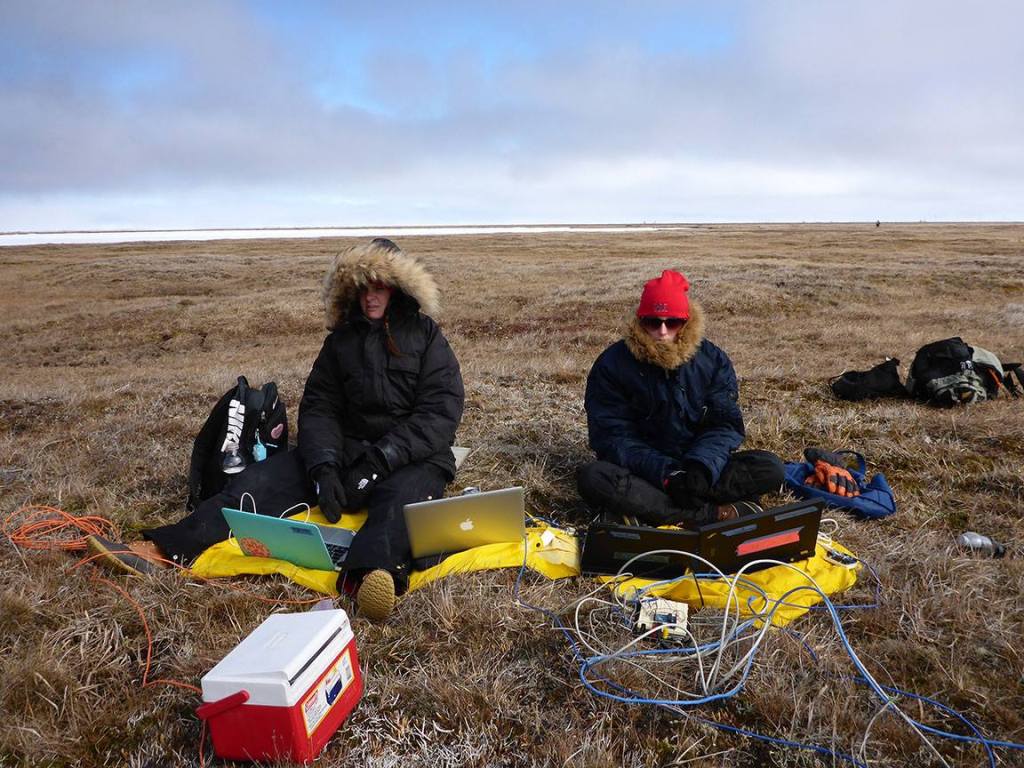
In June 2015, the summer after my finishing my junior year, we went out as an interdisciplinary team: a physics crew to deploy the equipment and a biology crew to determine deployment locations and interpret results. We spent a week out there and it was amazing. I have so many great stories of bird watching out there! I truly appreciate the bird watching hobby now. Birds are fascinating. You’re probably thinking wow she really is a nerd but like, I literally watched birds of prey PREY on other birds! And I even saw a bird do a broken wing dance for me to try to lure me away from her nest. I had no idea I was anywhere near her nest at the time. I later got up and realized I had been sitting on it the entire time. Thank GOD the eggs were all still in tact.

Photos below are us in the Arctic tundra taking data real time! There are also a couple photos of a local presentation we did. The community there loves being clued in on what research scientists come to do in town. They are quite involved actually, in a great way. They are very supportive because they have seen first hand, generation after generation, of how anthropogenic climate change has impacted their ecosystems.

I wanted to end this post about my junior year with the internship I got that summer, which happened at the same time as my trip to Barrow in June. It was my junior year and this was my last chance, before thinking about what to do after graduation, to get some summer research experience in a paid internship (spoiler alert: all STEM internships and graduate school are paid for!!!).


I had applied to about 20 internship programs both my sophomore year for the summer of 2014 and again in my junior year for the summer of 2015. I got one acceptance. But that didn’t matter because I at least had one offer to pursue and gain more experience in. I was accepted into the College of William & Mary’s REU program that worked in collaboration with the NASA Langley Research Center (LaRC). Both of these are very close to my hometown. In fact, the NASA LaRC is IN my hometown and was only ten minutes away from my childhood home! So, I began packing and preparing for my 10 week paid internship in Williamsburg and possibly Hampton, depending on the project I was assigned. I, of course, chose to do all astronomy related topics but was assigned a material science topic. So just to reiterate that at this point, I had very little astronomy research experience, even though that was my passion. The goal in undergraduate school is to try to get your hands on any kind of research experience because the skillsets are typically very broad and will serve you well throughout your career. And it did for me. Not to mention, my supervisor at my internship wrote all of my recommendation letters to graduate schools.

Later in the fall of my senior year, the College of William & Mary paid to have me present my research at a Council for Undergraduate Research (CUR) symposium in DC.

This also ended up being the same summer I did a college thing – I got a dog without telling my parents. This was around the time my mom kept saying she wanted another dog. My dad vehemently denied my mom getting a new dog. So my mom jokingly said one morning, Jordie you should bring a dog home that we will keep but your dad will be mad at you and not me. And I was like ha, I mean, yeah. I want a dog too! Only I wasn’t kidding.

Fast forward a couple weeks later, my boyfriend at the time had a brother who had recently taken on a stray beagle, Fievel. He was about 1 years old at the time of being found out in the wilderness of the Appalachia and was timid, shy, and very malnourished. I knew Fievel back then already as my boyfriend and I would sometimes take care of him in Radford. Unfortunately, Fievel’s current dog owner, after rescuing him, neutering him, vaccinating him, and giving him all of the things he needed, got a job that was pretty time consuming. It broke his heart to have to consider giving Fievel up to someone else but he knew he wouldn’t be able to give him the life he deserves while working 10 hours a day. I snatched up the opportunity. I remember coming home with Fievel, not saying a word about it at all to my parents, and just seeing their extremely angry reactions. My dad was throwing expletives all around saying how this isn’t a joke and I’m not financially stable to have my own pet and this and that. I mean it was all true. I should not have gotten a dog while broke, being completely dependent on my parents, and doing school full time. My mom “threw me under the bus” saying we did not agree to this! I said, Ma, this was YOUR idea. But damn, we sure were all one lucky bunch to have a dog like Fievel come into our lives. Twenty minutes after I had arrived home with a strange dog, Fievel and I were sitting on the couch just relaxing and watching TV. My dad comes in and pets Fievel and says, “Is he always that docile?”

I eventually renamed the dog to Ruca. Today, nearly five years later, my dad will insist on watching Ruca when I’ll be out of town or something (most recently, he offered to take care of Ruca while I adjusted up in Cambridge). We all love our little surprise addition. I truly was so lucky to make such an impulsive decision on such an easy, happy-go-lucky dog. He’s been by my side ever since!

Picture


Goodness he’s so young here! Circa Sept. 2015, just a few months after getting Ruca. This was in my old Radford apartment!

Writing all of this, I’ve realized I’ve unpacked A LOT. My junior year seemed to be one of the most exciting years from undergrad. If you want to know more about any of these experiences or how I applied to various programs or whatever it is, feel free to comment below or contact me!

PART III: THE BIG PICTURE

Recap:

  • Gamma-ray emission uncovered to the west of the Vela SNR
  • Investigations of this region in the X-ray uncover soft, diffuse X-ray emission overlapping with the gamma-ray position
  • We now look across the light spectrum using Aladin (free for everyone and you don’t need to download anything. It’s truly amazing – See over a dozen sky maps across the light spectrum right now: https://aladin.u-strasbg.fr/AladinLite/)

​Click the link above. I’ll show you how we found our optical counterpart. Type in “08 26 07 -45 00 00” verbatim, double check you have “DSS2” selected. Hit ENTER. Do you see a thin film of material move downwards from the crosshair in the center of the screen? Yeah – that’s our optical counterpart and you just found it using the gamma-ray emission’s coordinates.

Picture

Does your result look like this? Congrats! You just did astrophysics 🙂
Now the real fun sets in: I begin digging. Digging for information about the Vela SNR. How old is it? i.e. When did the progenitor star explode? What type of supernova was it? How far away is it? What available information is known, specifically coinciding with this gamma-ray emission?

Here’s what I found out. 

Vela is about 10,000 years old descending from a Type II supernova which we have discussed before here. Because it is a type II supernova remnant, it houses a pulsar, the remnant of the star’s explosion which powers a pulsar wind nebula that is quite large. Vela as it turns out is the closest composite SNR to Earth which means there are tons of literature about the region. I read dozens of papers studying Vela from the radio to the gamma-ray. It became apparent that the pulsar wind nebula is huge and is seen brightly in all wavelengths and so is the pulsar. The remnant itself was only known to generate gamma-rays 1.2 degrees away from the pulsar or about 15 parseconds (50 light years) but in the opposite direction of where we found the new gamma-ray emission and we are still not really sure where the gamma-rays in this other region come from. It’s possible it could be another interaction site (which I’ll get to).

Because Vela is a Type II supernova remnant, this means the area surrounding the remnant is quite dense compared to other regions of space. As a refresher, let’s remind ourselves that Type II supernovae occur when a seriously massive star explodes. Massive stars have shorter lifespans than smaller stars because the larger the star is, the faster it burns its fuel. Once it runs out, it explodes. The largest stars have lives as short as a few million years old. For comparison, our star, the Sun, is very “average” in size and will not explode at end of life but will rather complete a few evolutionary stages before shedding it’s layers and retiring to the white dwarf stage – which will take our Sun a total of 10 billion years. So, when a massive star is born, it is born into a dense environment of stellar gas, a stellar nursery, if you will. The most massive stars die off and explode the quickest and thus never leave the dense region of stellar gasses, so when it explodes, the explosion is typically very asymmetrical and quite complicated due to the complexity of the region. As the initial blast wave plows into interstellar space, it will readily interact with material already here like gas, dust, molecular clouds and clumps, etc. Depending on how fast the initial blast wave is and how dense the material is, it interacts differently. If the shock wave is still hugely fast, it will sweep up this material, shock it, and move it with the blast wave itself. If it is has slowed down considerably, it will run into the material and slowly shock and heat it as the shock wave dissipates into​ the material. The timescales of these interactions depend on the density of the material. 

Picture

I know right
Why am I talking so much about a remnant’s surroundings? Oh right, so, Vela is a Type II SNR which means that its surroundings are probably pretty clumpy. In fact, in 1998, when I was 4 years old, radio astronomers pointed their telescopes at Vela and saw an abundance of neutral hydrogen out here. They came to the conclusion that these structures were pre-Vela, or pre-existing. What likely happened is another massive star, possibly millions of years ago or more, exploded and its SNR expanded to be this entire huge neutral hydrogen bubble expanding into deep space and by the time Vela came along, the medium was made up of dense, clumpy clouds from the leftover material of this long-ago supernova, leaving plenty of opportunity for a fresher remnant to interact with it. 

This was the same paper I noticed our optical counterpart was being studied. Like, our exact optical filament, believed to be associated in some way to the mysterious gamma-ray emission, was being discussed and implicated in a theory in this paper, that was published over 20 years ago. 

Picture

Here in the greyscale is the optical emission (wavelength of Halpha). Our filament is in the dark curved section – corresponds to a (x,y) value of ~(30, 28). The contours show significance levels of neutral hydrogen. Contours essentially show you where the most significant emission comes from, where the innermost circle corresponds to the most significant values.
I remember it vividly – figure 7 of her paper – showing me that our instincts were, in fact, right. We suspected the blast wave of the remnant to be running into something, generating the emission we were observing. This 1998 paper confirmed what we thought and provided the last piece of the puzzle: the something it was running into. A small neutral hydrogen cloud, at the same position of the optical filament. What’s more is that they shared not only the same region of space, but also opposite curvature. You can see it in the picture above. See how the filament seems to trace the contours of the hydrogen cloud? Finding “puzzle pieces” like this is actually pretty substantial evidence that these two are not only connected, but are telling you an interaction between some type of shock wave and a cloud is occurring. 

​We found older X-ray maps from a previous mission, ROSAT (The Roentgen satellite, named after the scientist who discovered X-rays), that mapped the entire Vela region in the soft X-rays. You can see in the image, appended below, where our source lies with respect to the entire remnant. Let’s spend a few minutes dissecting the image for a more wholesome understanding, then we will loop back to the important piece of evidence here.

Picture

ROSAT image of the entire Vela SNR from 0.4-2keV in the X-rays. The super bright blob in the upper right is Vela Jr. Another well known SNR but is unrelated to this system, it’s a projection effect.
We see the entire remnant right – looks almost fully spherical in the X-rays. Compared with Vela in the optical here, it looks quite different, doesn’t it? In the X-rays, it’s nature is obvious. This emission is found to be mostly from really hot particles from the blast wave and from stellar ejecta that have been swept up as the supernova expanded into its surroundings. You can identify a few “break out” regions, one is directly to the left (east) and the other is more subtle, and fainter, directly to the west (right) and much farther out. These break out regions are indicators for how the density in the interstellar medium changes. Where the blast wave has been able to break into indicates less dense regions. Where the bright boundaries exist, this indicates where the blast wave has coincided with denser material, shocking and heating it as it begins to slow down due to the blockage.

So, essentially the bright X-ray boundaries give you a little information about the 1) density of the surrounding medium and 2) speed of the shock there and 3) where the remnant ends and the surroundings begin.

In summary, we have an optical filament attached to both the X- and gamma-ray emission to the west, that is now also associated with a neutral hydrogen cloud and they share opposite curvature, and all of this coincides with a bright X-ray boundary. 

The big picture: the remnant’s front shock wave is interacting with its surroundings and, in the west, it is attributed to a small hydrogen cloud. 

…. What? You thought this is where the story ends? Heck no! This is just the beginning. Now that we have established that the SNR is interacting with its surroundings – we just confirmed the Vela SNR as a candidate for fresh cosmic ray acceleration.

Recall that SNRs and PWNe are some of the most extreme objects in our galaxy and are thought to generate the bulk of Galactic cosmic rays. So a new challenge has revealed itself to us: Can we establish the Vela SNR and its shock-cloud interaction as a possible site where cosmic rays are produced?

Quiz! Take it here: http://www.quiz-maker.com/Q3U7WA2

TRAVELING ON A BUDGET

Yes, it is possible to travel on a budget! ​

A really, really tight one even. Many of the details I’m sharing I learned from Kirsten, one of my dearest friends from high school whom I visited in Europe in summer of 2019 (and she’s pregnant with their first child!! Due in August 2020). She really knows how to get the most out of traveling and being a tourist and it helped me immensely when I came back and wanted to explore my new area in Cambridge. Much of this will apply to travel plans to outside of the country but a lot of the tips and apps I used are still very relevant in your home country. I used the apps a ton when I first moved to Cambridge!

Step 1: Start saving!

Depending on your income, you’ll need to sit down and figure out how much time you need to save up before planning a big vacation. It’s doable, you just need to have a little self control with a temporary tight budget anticipating future travel expenses. 


For example, I started saving up in January 2019 and spent two weeks in Europe in June 2019. I saved about $3,000 after having bought plane tickets which were ~$800.00 per ticket, round trip, and that did not include checking baggage or meals. It also did not include airport parking expenses which I also paid ahead of time to reserve a spot. So, in total, I spent around $4,000 to travel to Europe for two weeks. I paid for the plane tickets and parking in February of 2019 and continued to save (and be incredibly frugal) up until June. I managed to have saved up about $5500, which got me through Europe, miscellaneous expenses, and that odd summer gap when Clemson stops giving graduate assistants a stable income (so I was able to pay all of my bills on time, yay me!). Side note: Yeah – Clemson pays their TAs a yearly salary but within a nine month period, so we do not get paid over the summer unless our supervisor has funding. Luckily, my supervisor had funding so I was a part time research assistant over the summer and it helped me scrape by until school started back up (and thus, the stable income started back up, too). It may sound awfully daunting to save up that much in a short period of time if you consider yourself already living on a tight budget but trust me when I say having these experiences abroad are unforgettable and totally worth it! Also, if you can plan even more ahead of time, you can give yourself ample time to plan a really nice, luxurious vacation. 

Picture


Don’t feel guilty either. You deserve this.

Step 2: Begin a detailed itinerary.

Write down where you want to go, how much transportation, hotels, meals, and miscellaneous expenses will cost; make a section that reminds you to do certain things like check to see if your bank charges foreign transaction fees, call your cell phone service to make sure you don’t accidentally run up your bill while roaming. In the same itinerary, list all of your expected expenses and overestimate them all. Tally them all up and use the total figure as a marker to save up for in preparation. 

Example Itinerary

arrow_down


Now, the itinerary serves many purposes. If you’re traveling alone, share this itinerary with loved ones before heading out. If you’re traveling with a group, you can make sure everyone is on the same page with plans by sharing the itinerary around – even better if everyone contributes! If you’re traveling in a group, you should still share this itinerary with loved one before heading out. You just never know. For example, on my itinerary I listed all of the places (including hotels) where I was staying, phone numbers and addresses of friends I was staying with, just in case. 

Step 3: While we are on the topic of safety, make digital copies of your proof of citizenship, plane tickets, and plane itineraries.

I made digital copies of our passports, state-issued IDs, and airport itinerary. I had a copy, Noah had a copy, I printed out a copy, and I share these with my family as well, ya know – just in case. Did I go overboard? Yes, let’s remember ya girl has OCD but still, these are good things to do. What if you lose your passport? What if it’s stolen? You’d like to get back home, right?!

This ends the segment of preparing for travel. Now, you’re somewhere in Europe. How do you get around? How do you know where to sight see and explore?

Picture


First of all, your cell phone, while traveling abroad and whether you like it or not, becomes your best friend. You’ll probably want to invest in two things (but are optional, I made it without one but sometimes, barely):


1. Mobile cell phone charger. Get a cheap one from Walmart for ~$10.00. The one I had is small enough it fits in any size purse. It’s good for just one full charge but I would just be sure to charge it each night before another day of adventure.

2. Mobile hot spot. You might very well want to get this and do everything only on wifi. This way you have no worries of running up big cellular service bills for roaming when in Rome. I did not have one at the time but some AirBnBs we stayed in let us borrow complimentary mobile hot spots (one was a Wuawei!!) but I wouldn’t bank on that being a norm. Most United States cell phone carriers bill A LOT for roaming. You can Google your provider and their roaming policy. For example, Verizon does a $10 “Day” pass that lasts 24 hours and lets you use your regular mobile plan anywhere in Europe. But, if you there for 2 weeks, $10 per day adds up. So, I only did the day pass on days I was traveling (flying from U.S. to Belgium and back) and that was it. Otherwise, I only got connected when I was on WiFi. There are other options but I found the day pass to be the most convenient.

There were 3 apps I used religiously in Europe. 2 out of the 3 are free.

CityMaps2Go.

Seriously a must. Here’s everything you need to know about CityMaps2Go:


  • Download free city maps. Yes, the entire city.
  • First city map is free. After that it is $20 for unlimited free city maps forever. One time $20 purchase. I recommend this route.
  • Once the city map is downloaded, you can mark any restaurants, memorials, tourist sites, beaches, whatever you want on the map and it will save it for you to come back to. 
  • After downloading the city map, it is accessible with or without data or Wifi. This is a huge plus if you’re traveling abroad! It also accesses your saved locations without having connection services.

It saved my life so many times. I used these maps as GPS for most of my time in Europe which is how I got around without using data so often. I really recommend this app when traveling abroad! Since I’m a pro customer for life with that $20, I used it when I first visited Cambridge, too. Oh, and when you are connected to Wifi, you can browse the other tabs in the app to see popular places people like to visit like famous artwork, where Van Gogh lived, what house Anne Frank hid in during the Holocaust, and more.

GetYourGuide

Have you ever caught yourself in a new city, wanting so badly to explore, but coming to a halt because literally all you can think of to do is go to a new restaurant to eat? But you just ate. So what else is there to do? I did the same exact thing until Kirsten showed me the way with these two apps, the first being GetYourGuide. Here’s everything you need to know about GetYourGuide!


  • Absolutely, 100% free!
  • Requires you to use either data or Wifi
  • Browse guided tours, boat cruises, brewery tours, Holocaust memorials and tours, museums, horse back riding through beautiful landscapes, those really popular hop-on hop-off bus tours, and more on this app. Of course, if you decide you want to go a on boat cruise or any other of the available activities, this will cost you money. But the app is great for comparing prices of a certain activity and, once you’ve decided, you can book your activity through the app. 

I used this app to book an Anne Frank tour in Amsterdam while we were there (and Kirsten used this app to book us many other tours and activities!). It was a guided tour that took you throughout the city to major spots where history took place in the resistance against the Nazis. The tour ended in front of the Anne Franke house, where she hid for the last two or so years of her life, before dying (likely of an illness and/or starvation) in one of the concentration camps. Maybe you’re not into history, and that’s fine too, there’s plenty else to do like visit tall towers and castles that are beautiful and loom over their ancient yet prosperous cities. I found it especially heavy that Amsterdam would make golden stones to place in front of the old locations where Holocaust victims’ houses sat. Not all of the homes still remain, though a few still do, and the golden stones are a part of the walkways directly in front of the buildings, new and old. The golden stones include their names, birth and death year when available, and the concentration camp where they died. It’s an awful yet necessary reminder. In fact, here’s an example of the golden stones below.

Picture


Well, ok, I guess they’re bronze.

Rome2Rio

This app is particularly useful in getting around in any city you are in. You can plug in where you are and where you want to go and it’ll check all of the available public transportation options in that city and help you get there! Here’s everything you need to know about Rome2Rio:


  • 100% free
  • Requires Wifi or data
  • Works like Google maps but pulls from all local public transit and ​gives suggestions on where to explore at the final destination.

These are the things that got me through Europe on a budget with a United States cell phone plan. I hope these help you in preparing your next trip! Maybe one day you can share with us all of your favorite experiences, too!

A few nostalgic photos are shared from my Europe 2019 trip below!

Picture